Wednesday, January 29, 2020

Air caps


Its always the little things that end up driving me crazy. The air intake holes for the rear cabinet heater I had always said..."One day I'll find something that looks better than that!"


So I went on a mission. My vision(as you likely anticipated) is for round corners, soft and flowing. So I started looking at end caps for pipe. My first prototypes were from metal pipe. They looked good but super heavy. All I could think of is one of these things falls off when I hit a bump on the road and a poor passenger gets knocked out after this thing falling on their head.


So I changed medium and moved to 4" PVC pipe end caps. The bonus of these is they are very light and easy to modify. The caps as manufactured had two negatives
1. Too tall
2. manufacturers printing casted into the lid

So the printing, I used an acrylic burr from my dental armamentarium to grind off the printing, then various sandpapers to make it smooth. As for the change in height...nothing a jig won't handle.


Now that the height has been taken care of, I needed to create a mounting base or flange. So capitalizing on the properties of PVC pipe


After cutting a section of pipe and running a relief cut up the length. I placed it into a pot of boiling water. It softened the pipe so I could lay it flat, but I wasn't properly prepped to create a super flat surface, so I tried again, this time using dry heat (about 210F in the oven)


My lovely wife was not super impressed I was slow baking 'plastic' in the oven, thankfully my daughter had her distracted enough with a hair cut that I was able to set up and execute the job!


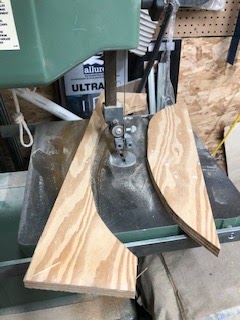
Once thoroughly heated I pressed them between 3/4" MDF board. 
Then after a night of cooling I was able to cut my flange on the band saw!


Monday, January 27, 2020

My sweet little Sofia

So, this happened.....my baby brother finally....FINALLY figured it out.....and lo and behold may I present the sweetest little thing, Sofia!(melt!)


She is just over a month old now, but I am sure that her father has aged a year in the last 30 days. It will be good for him to focus on her rather than the Winnipeg Jets!


And while he changes his fair share of diapers, I work away in the bowels of Fillmore, well that was dramatic....the engine room isn't exactly the bowels but, come on man! I needed a Segway! After test fit of the rear portion of the cabinets, I painted and sanded and sanded and sanded. The end result is something that hardly anyone will see, even less will notice and few will care....but I do!

While I worked on the rear install, I keep momentum with the flashy portion in the living area. First coats of primer followed by multiple coats of cabinet paint with sanding with 2200 grit paper.
I am so happy I decided to remake the cabinet, I had entertained the thought of...."well it's not ideal....but its good enough!" attitude, which would have included painting the old cabinet with brush- in place. That would have resulted in a crappy finish and a cabinet that I would clock my head on each and every time in the bus.
This is so much better, it looks great on the workshop dry fit. A couple little add ons and then we get to install!!


Thursday, December 26, 2019

A picture is worth a thousand words

We so often get caught up in our own little problems of life and forget that the daily struggles are life. In the environment of social media marketing being so prevalent that we mistake insta feeds and snaps as reality, we lament that our lives aren't as picture perfect as the feeds that bombard us. The reality is that the journey of life IS the point......not the perceived end goal.
We recently had family pictures taken by a very good friend of our family, a super talented wonderful young woman Poppy Morrish and the resulting pictures are fabulous but as I looked through the pictures it was reinforced in my heart that the process of taking the pictures, being togther, playing in the snow, being goofy, being vulnerable to look like a dork, laughing....those are the things that make the magic in the pictures. Those are the important moments, and the moments that define our lives together.
I love my family, thank you for the journey of laughter and tears, calm and chaos, I cannot wait to see where our journey goes from here!

Speaking of a journey, the back rehab/reno/remodel....whatever you want to call it.....forges ahead. After all my gluing and clamping, I was finally ready to remove the forms and see what we had made. After trimming the new cabinet walls my dry fit proved to be positive

The curvature of the piece isn't quite as smooth as I would have wished for, but with each new trial I learn where I could do better and its easy to trace where I dropped the ball in my technique. Being that there really wont be a plethora of hands running over the outside of the cabinet to feel the variations in curvature....I think I can live with the error.
Now before I put everything together, I needed to come up with a conclusion for my vents from the root top. After theorizing a number of what turned out to be bulky space consuming options, I mused about simply capping the vent off and not worrying about the air flow at all. And there in lies my answer. I simply cut the pipe above the cabinet level and placed a blind end, a cap on the pipe, but modified the cap and the pipe to allow air flow!
Once that was done, assembly of the cabinet backs could be completed and test fit. Now maybe a little paint?

Thursday, December 19, 2019

Renovation

The problem is only if your 5'10" or taller I think. My design for the back overhead cabinet was good in concept.....bad in execution. The issue was if you wanted to sit and lean back on the back rest, if you were the least bit tall, you whacked the back of your head on the bottom of the cabinet. After doing it a few times last year I vowed that this years winters project  was to redesign the cabinet.
So here goes nothing!


First order of business is deconstruction, which actually started with a visit to polar mobility to remove the refridgerant so that I could take down the A/C unit in the middle of the cabinet.
 Once everything was taken apart, it was a blank canvas.
And once I started....I was committed. The plan was to simply "push" the cabinet back into the engine room. Leaving the vertical steel supports in the wall meant some changes to the cabinet storage spot locations, but otherwise a simple concept.


Again I wanted to follow and highlight the curvature of the roof line. I know inside the cabinet you won't really see the contours.....but I would know!

It was time to cut the base and push it back into the engine room.
Houston, we have a problem...


After I cut the base and put it in place, I remounted the front of the cabinet to see how things looked. Once things were in place it was obvious we had two problems. The first I was expecting. Due to the metal vertical supports, I had to move the hole for the cabinet a couple inches towards the outside. Therefor the openings in the front face and the cabinet in the back do not line up. The second I didn't think through until I started to cut the holes. There are two ventilation stacks coming from two roof vents/louvers. Originally designed to provide air flow to the occupants of the bus, the routing into the passenger compartment has long since been removed. When I refurbished the vents up top I made sure to place a 4" pipe to allow for directing of the air flow. Now that same idea is in my way, as the path of the pipes is directly through the cupboards. So I'll have to let that problem ruminate for a while so I can problem solve.

In the mean time I want to create the 'backs' of the rear cabinets and, of course, I want them to follow the roof line, not full of sharp 90 degree corners. So I first traced the shape of the cabinet opening.

Transferred those to some 3/4" MDF and created a laminate press/jig


Then I put in a number of cross braces, cut my strips of 1/8" wiggle wood, lathered them with glue


And tried to use every hand clamp I had in my shop...

Tuesday, December 17, 2019

drawer design

A few more sessions spent in the shop finds the special cabinet with more walls on in, a coat of primer and a coat or two of paint. I am waiting for a few other pieces to be ready so I can spary the lot of them


The cabinet will have rounded edges, which means to maximize storage space we will need to round the drawer edges too

In the same fashion as the custom wall of the cabinet, I employed the same technique to give me a custom shape drawer. But as indicated, the fabrication left me with  90 degree/square corners. And that will just not do. So I rough cut the edge off, then use a rough carving blade on my angle grinder, then sand like I've got nothing better to do!
In the end, I get a cabinet drawer that has the shape I need to accept the drawer front with the 3"radius 90 degree rounded face.

Wednesday, November 13, 2019

Hey Trump! I built my wall...and I paid for it myself


I'm currently reading a book, about a guy who lives a very simple life....his occupation is a little dark- a highly trained and troubled assassin who only eliminate the ones who he individually determines are  the "bad guys". The point is not that, the point is, in the novel his home base...his 'lair is super clean, super organized, super minimalist.....
 Some days I yearn for that when I walk into my workshop...
But it would take so much of my time to pair down, clean, organize and categorize things....that I get used to the kaos.
Now that I have finished my Styrofoam prototype, it's time for me to translate the concept into the reality of permanent building materials.

After the lower portion of the dinette cabinet is done, it's time to create the curved wall
First order of business is a template to act as a mountable support wall and a press to laminate some 'wiggle wood' into a 3/8" curved plywood wall. I traced and cut the path of the chair to give me what I call big spoon/little spoon
 I then cut a 1 1/4" strip off the big spoon and rebated some 'ribs'


 the end result was a fancy press for the wiggle wood, with the big spoon acting as a support wall for the cabinet as well.


 Lots of glue, and lots of clamps, and lots of time!

Initial placement looks promising,  


With the wall tacked into place the chair is free to swivel


Sunday, November 3, 2019

Arts and crafts part two

 So the cardboard cut out I learned a lot, mostly that cardboard is good fro tracing or making flat templates but lacks some of the required structural integrity for the prototype. So I started again using solid foam insulation that I have kicking around.

 Then after I had the framework set up I used cardboard to trace the path of the chair and then transferred that to a MDF table top.
 Next I started making the frame for the small cupboard. Being small, you would assume this would be an easy build....but its one of the more complicated ones. I have to build it in 2-3 pieces that then will be attached together!


The first step is the lower box. It is a small space but will have a pull out drawer with, like all the other cabinets. rounded corners

Life is good when your listening to good music, with good coffee and doing a fun project.

Wednesday, September 4, 2019

Arts and crafts time

I chuckle when I think "I'm using a glue gun to build cabinetry for the bus" But, I am....kind of.
I'm down to some of the non traditional...non square....non-easy cabinetry in spaces that are tight and non static. So rather than build something out of wood, I decided to use some left over cardboard moving boxes and my glue gun to make a prototype


It was long and arduous work, made marginally barrable by fresh hot coffee and CBC music playing.

The mock up was made, placed, removed, modified, replaced and repeat...numerous times. The end result was visually disappointing but allowed me to conceptualize what I need to do. I have more ideas percolating in my head.


Oh No! Not again!!

You may remember this time last year I found a  wee problem I had been checking things out and found a significant break in my flywheel hous...