Sunday, September 25, 2011
Be creative!
The other day while I had Randy slaving away in the engine compartment riveting 'till there was no tomorrow, I wasn't just sitting there watching him while drinking coffee. No Sir!, although the thought crossed my mind, I had my own demons to slay that day.
I had previously had a new transmission linkage cable made, and this was it's time to install.
There, easy enough to say, but harder to do.
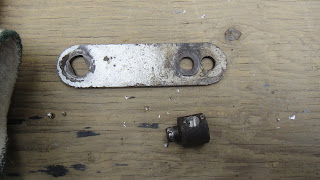
This is the shifter bar that attaches to the tranny. It was still attached to the old linkage cable which had been severed with an acetylene torch on the donor.
Removing the shifter bar was easy peasy, the little 'nub' as I will affectionately call it was a little more difficult to undo. Well that's not quite fair, "undo" infers that if you you could "redo". It was more like the little "nub" was unceremoniously sheered off of the old shifter cable with obscene amount of penetrating oil, heat and a pipe wrench. But where is the peace and poetry in that?
Life sometimes isn't all babbling brooks and daisies, reality is bloody knuckles and the occasional 'F' bomb when the kids are out of ear shot.
None the less, I had in mere moments taken a Job which I thought would take 20 min and created a 2 hour puzzle.
My first instinct was..."I'm screwed, where the hell am I going to find a 'nub'?" My second thought was how embarrassed I would feel walking into a heavy duty parts store and awkwardly try to explain what a 'nub' was. So I did what any man would do.....I got out my drill, bored out the old screw and re tapped the nub!
Unfortunately that was a fail as the kids would call it. Re tapping the hole left me with unusable threads. But it got me to start thinking outside the box. If I can drill and tap the original, then I can drill and tap a new one. I couldn't mill a small shaft from a larger piece, but I did have a bolt that was the perfect size. I welded it on to a piece of 1/2" round
Drilled some holes for the shifter cable and the retention pins(cotter)
Tapped the hole for the cable, and then cut the ends off! This was right after I cut the ends before I had a chance to smooth polish and fine tune it, but I am happy to say she worked like a charm. Unfortunately that was the easy part. I now have to figure out a method to attach the other end to the original shifter in the bus. I could remove the old shifter and put in a new one, but I like the look(and feel) of the old floor shifter and I want to keep it if I can.
As I said this took me longer than expected, so after Randy finished the air chute, he moved on to problem solving for positioning the new accelerator.
Subscribe to:
Post Comments (Atom)
Oh No! Not again!!
You may remember this time last year I found a wee problem I had been checking things out and found a significant break in my flywheel hous...

-
Perhaps it's because I am learning in a field that I have little previous experience in, but when things go as planned I get quite the ...
-
I used to shake my head in wonder how someone could build a house and then for years seem to stall out finishing it by leaving small jobs u...


No comments:
Post a Comment