31 years ago seems like only yesterday in some respects but when I look at the photo of Michelle and I on our anniversary I see how time has passed! Happy Anniversary my love....here's to another 31!!
One of the 'I'll get to it' jobs is a design flaw of mine when running the main wire looms from the engine room into the living area of the bus. As we all know from running cable wires in from a satellite dish or phone lines coming into the house, the wire must approach the point of entry from below.
In my defense, I didn't have many options. When running the wires from the engine room they had to be held up and off the rear diff. But that then meant that the wires were entering the point of entry from above. THUS every time we travelled in the rain, we had a water leak in the back. So its time to put my thinking cap on and devise a system to prevent or at the very least, minimize moisture.
Like many things with Fillmore, there are a number of steps you need to take backwards to move forward....a little controlled dismantling before you can build something new.
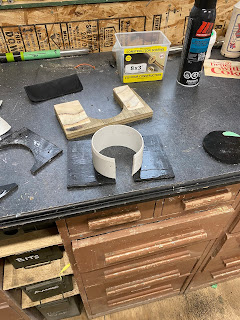
So removed the drive shaft and jacked fillmore's rear end up so as the diff will hang down allowing myself more room to maneuver. then I created a mounting plate(top piece of the wood press seen below) at the point of entry to give me a consistent surface to work from.
Then to my wifes delight I started baking PVC pipe in the oven. When you heat the pipe to 280-300F it moves into a
thermoplastic state. Im not organized enough for a one off, so after the second or third round of baking in the oven, Michelle had enough and I was banished to heating in the BBQ. Not as even and precise but it worked.
So, for those of you who have already see the problem, you know your plastics. For those who don't (and I didn't) not all pipe is created equal. PVC is not ABS. both are thermoplastic, both can be bonded to.....with like plastic. But if you try to bond PVC pipe(white) to ABS pipe(black). You not only mess everything up but the glue never dries. Usually you have one shot to put the pieces together and then you are married to it. I knew I had messed up when I was able to move the pieces after a few minutes.
So, some more baking, some more gluing,
...and then finally, a proper mounting flange.
Now here is where I found a thread.
Most of the cabling that come out of the living area all travels in the same direction. All but one cable. After some wrestling I decided the best way to handle it was to re route it. All I would have to do is disconnect it from the coach batteries. To do that all I had to do was remove a third of the cabinets in the back.
After that, just uncover the battery box and disconnect the wire in question.....OMG,Omg,omg!
I just pulled that thread and the sleeve of the sweater just fell off!
I may have neglected the topic of 'off season' battery maintenance. Although by the time I took this pic I had disconnected some of the wires and done some clean up but this is still horrendous.
One by one I disconnected the batteries, removing them as I went along, cleaned up the wiring.
The batteries themselves got cleaned up and inspected. Most of the cells were low and I was concerned there had been overheating while charging as the battery temp monitor from the inverter was damaged and likely wasn't regulating max charge temps.
Update: I took the batteries in for testing......bad news is they are all toast. Damage to the cells. So THAT was an expensive mistake. The good news is I got new batteries.
After some custom cable making,
I have a new battery bank ready to go!


.jpeg)


.jpeg)


No comments:
Post a Comment