Tuesday, May 31, 2016

Measure once, Cut twice......do it again.

For my profession  we attend continuing education sessions throughout the year as part of our annual requirements for licensure. Like most things there are good ones and there are bad ones, but we go to enough of them that you almost know in the first hour how realistic the presenter is based on whether or not he/she is true. What I mean is... none of us are perfect. Despite what I keep telling my wife about my rendition of Loverboy's "The kid is hot tonight", none of us are perfect. We all make mistakes.
So when a presenter shows us nothing but clinical perfection, I know that this isn't the real story. To show only your successes, the ideal result, and not share the tumultuous journey to get there, is like only sharing the punchline of a joke and expecting to get the same gregarious laughter.

So in that vein of thought...
I spent a long time getting the top edge of the front cabinet facing just right. I wasn't worried about the bottom edge, as I could simple trace the edge on the back side and trim to the line.
But then at the last minute  I got fancy, I decided to bevel the edge and adjusted the saw to give me a 45 degree bevel.

Nice!....not! I didn't even complete the cut. I was about 6" in when I thought it through and realized that the cut line was my finish line of the back edge. My front edge would be higher because of the 45 degree angle, and I failed to measure that out to ensure I wasn't violating any other feature.
I violated another feature. The damn speaker cover....AGAIN! In the photo, the lower second line is a simple right angle cut at the level of my rear finish line. When I realized my mistake, I thought what the hell, make sure a 90 degree cut gives me room, then I can play from there in terms of cut angle.
Thankfully, the mistake made a great template, a router bit made for an easier bevel,
And by midnight I was back where I started...

Saturday, May 28, 2016

Let there be music!


OK, premature yes, but this brings us one step closer to music and lets face it. No matter where you are, who you are, or what the situation is. Culturally if there is a chance for a musical expression of the situation we understand it better, we enjoy it more, it hurts less, whatever....music just makes it better.

So, get to work young man and let the music play forth....
Now that I have re-made the front face for the rear cabinet....it is time to cut the speaker hole. It's always a little nerve racking to get to the point of redo....

But the old adage, check and re-check, and re-check again worked well for me this time. I am happy with the result.


Now, I could just screw the speakers into the cabinet, but the speaker guy strongly suggested (actually he said if I didn't I might as well throw the money away) that I build speaker boxes for the backside of the speaker. This was half the sound isn't lost into the cabinet and absorbed by whatever we have stored in there.Of course, my quasi obsessive compulsive personality required that I stay true to the general theme of construction and round any edges I could.
You'll have to look hard to see them...but they are there. And that's another check put in the finished column.

A poor picture because of the front lighting, but now it's time to turn my attention to the front cabinet.
A bit of a challenge as the top edge had to be scribed like every profile against the ceiling, but the back edge had to be beveled as well at 45 degrees! As well the existing speaker holes in the metal facing had to be enlarged.
My trusty skill saw was my weapon of choice. It pushed through my beveled cuts, and with a change of blade to a metal cutting bit it trudged through the metal....well some of the metal. This saw is 20 years old. One of my first workshop additions. But when I was cutting through the plywood, I could hear it slip here and there. As I cut through the metal....I could smell the motor. Then in a puff of black smoke, it belched it's last breath in my face, and promptly stopped.
Thankfully I had my mini reciprocating saw that I had for sheet metal work, so I pulled it out from the depths of the tool box and the progress machine marched on.

Wednesday, May 25, 2016

I think I need a wee dram!

"Best laid schemes o' mice and men an' men"...Eye Robbie Burn never spoke a truer word. He composed the poem in 1785, nearly a quarter millennium later I am on hands and knees muttering the same sentiment as I destroy a piece that I have created, in the name of progress of course. I suppose you can say that I more aptly improved upon an existing design!
The placement of the couch was determined by a combination of the most efficient use of space, how the couch folds out(distance from the wall), and the co-pilot chair. As a result the forward edge straddles the wheel well. I welded in a support so the couch could literally sit on the wheel well, and that would then give us an additional 5-6" of floor space on the other end. In concept it was what we needed, in reality it significantly, and negatively, affected the forward arm rest design and stability. So, as my good buddy who is a surgeon says..."To cut is to cure!"....and I cut it out....well half of it anyway.


This then allowed me to create the matching forward arm rest.


Yet to be completed is the sliding storage drawer under the couch. It kills me to move to the next item on the to do  list but as Chaucer said " time(and tide) waits for no man." and I have "miles to go before I sleep"(Frost)

OK, OK I'll stop with the quotes. Again I find myself in a wee pickle....what ever that really means... but for me it really means I screwed up. Well OK maybe I could soften that a little and say I failed to think it through from start to finish in it's entirety. After spending a fair bit of time getting the front face of the rear high cabinet just right...I went to cut the holes for the speakers. All was well until I placed the speaker cover over the speaker. Yes I had allowed for the size of the mounting hole but I failed to take a close look at the speaker cover to see how much extra space I would need to have it centred and balanced in the space.
The speaker mounted in there beautifully, but the cover hung over the door opening....
Back to the drawing board...
I enlarged the side panels by two inches towards the inside. That SHOULD do the trick!!

Saturday, May 21, 2016

Couch Potato

Smells bring back memories. The smell of coffee and bacon brings me back to being a teenager at Setting Lake in Thompson, MB. Sitting on the deck with my Dad in the morning, munching on a breakfast sandwich while he drank his coffee and we talked....or just sat in the comfort of silence.

The smell is wood dust, fresh wood dust. It brings back more recent memories of my own kids and playing in the workshop. Making birdhouses that will never go out, but will be painted every colour of discounted mistint from the hardware store while I lean on the work bench and listen to her stories, making cars out of 2x4 for my 3 year old who loves everything and anything he sees with wheels.

I know I will forget many useless details and info in my life but I hope, when ever I smell coffee, bacon and wood dust, I smile as deep and as broad  like I did last weekend.

Order of business for today, couch. I have, on a number of occasions, "installed" the couch. But now I'm getting serious. It's time to fabricate a frame. Specifically end supports and arms for the couch potato in us all. After Jeff and I did a mock up, it was time to fabricate a real thing
Of course, nothing is square and nothing is quite 'plum', so we have to scribe the wall contour first...


Then a little trim...this only shows the first pass...each piece required a little nip and tuck here and there, about three go rounds per I'd say.

After a bit of figuring on the fly, and prolonged laying on the floor looking at the problem from various angles, here is what we have.


Now, one of the challenges is heat ducts from the furnace. I have six outlets, so I have to lay them out to decide what I want and where.
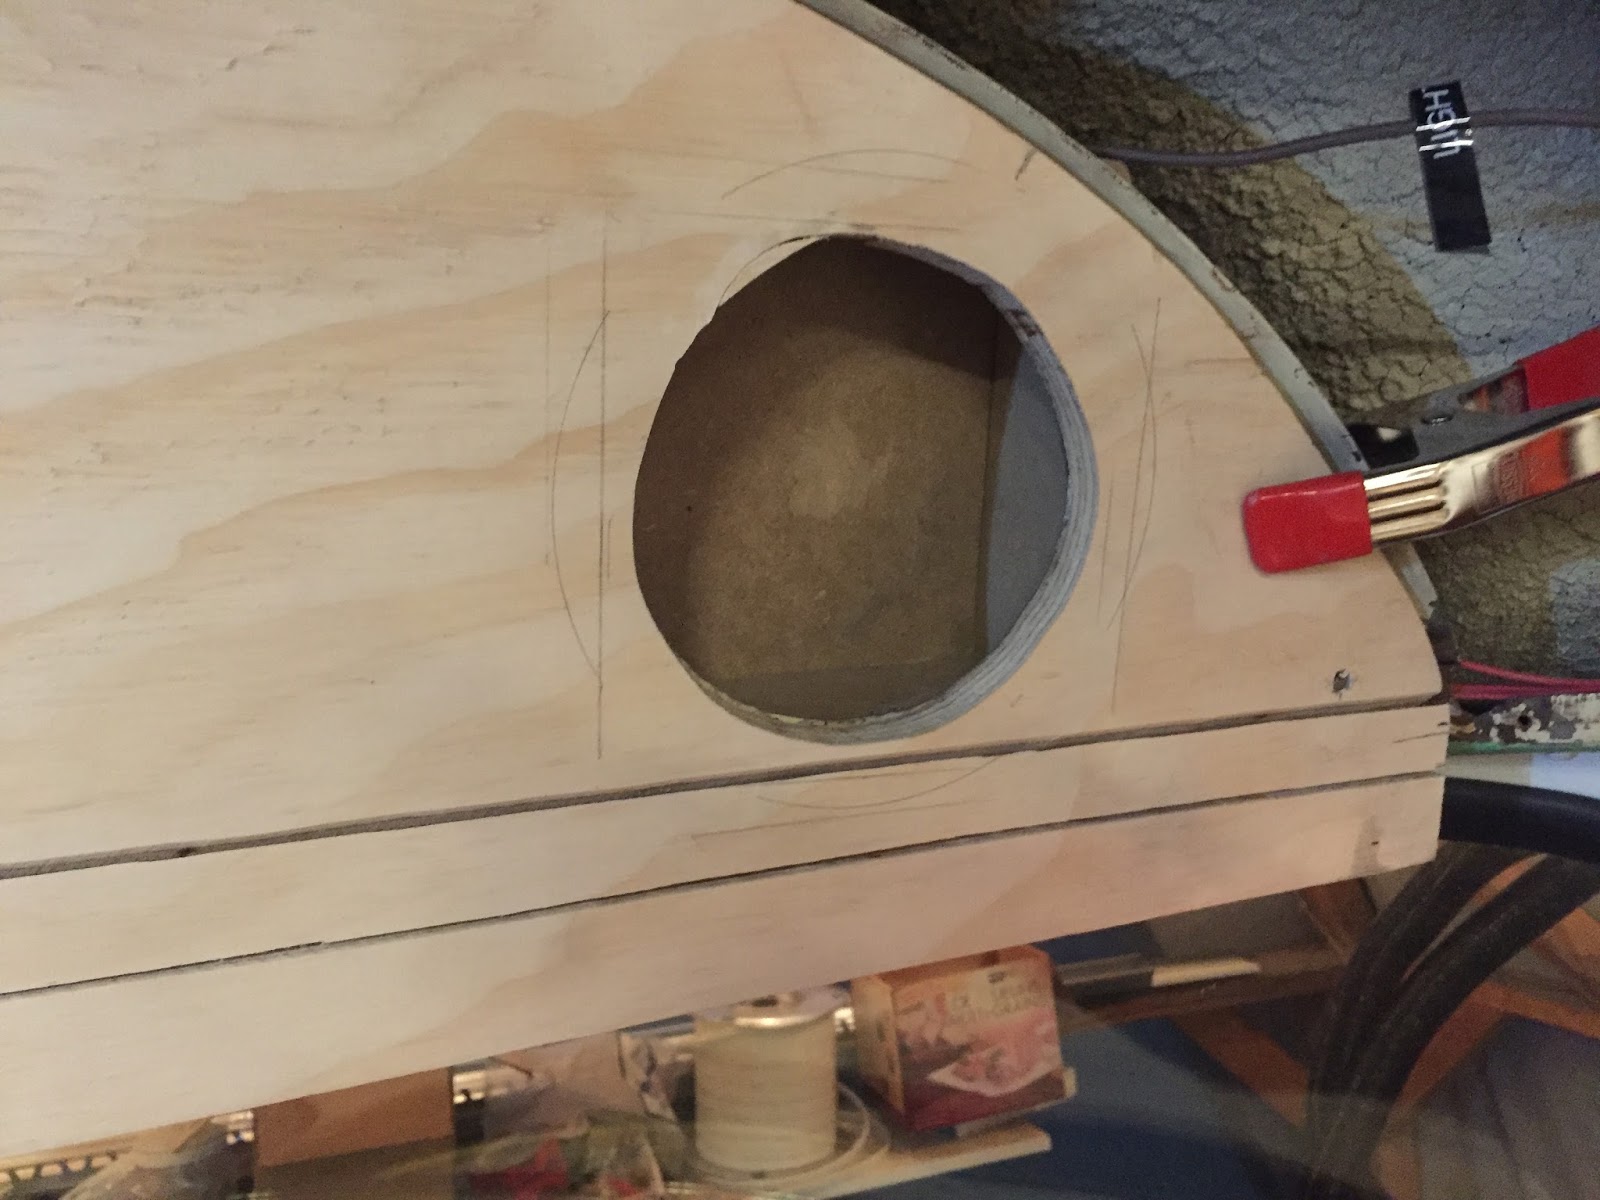
I designed the arm rest/support foot to house one of the adjustable registers....now it was time to commit.....and drill!


Things worked out well. The ducting runs just where I need it to be, the arm rest is nice and sturdy. I even managed to incorporate a wood accent from a couch that was in the house I grew up in. Right now it's temporarily in place but is designed to be hinged so you can open a storage area in the arm.
Now it's time to move to the other side....the more difficult side. This arm has to straddle over top of the front passenger wheel well.

So far so good....it's a work in progress, but the key word is progress.

Wednesday, May 18, 2016

burning the midnight oil

Michelle and Anna are in Banff, Jeff is in bed...and I've had coffee. I love a nice hot coffee after supper. The rich smoky-earthy dark and dirty jump start your taste buds French press kinda coffee.
The down side is, I'm wired at bed time. So, being too late to run power tools outside in and around the bus, I decided on a quieter pursuit of trimming my rear bench doors.
Remember that Michelle is out of town, and when she is I often bring bus work inside, no surprise. But when we were texting goodnight and I sent her this picture she panicked that I was using her 'good iron' for woodworking! I did play dumb for a few minutes, but eventually fessed up that no, in fact this was an old iron that we've been using for hot waxing skis for many years already!
I love it when I find little specialty tools that I forgot I had.
Trim and sand....looks great
Took some doing but eventually I was able to hang the doors and now that is off the list. There are still other doors to do though!

Monday, May 16, 2016

Momma needs a new pair of shoes

we can be walking through the mall, and Michelle will see a little foot bling and exclaim "Oooohhh, momma needs a new pair of shoes". All I have to say is I get it. Sometimes you see something that is so sexy at the hardware store that you just "need" it, or you got yourself into a corner and you have have to find a solution...kinda like Michelle needing that specific pair of shoes to match the specific dress for the specific occasion. Make sense....or am I reaching for validation for my tool habit?

Either way, I solved one problem and created another. The A/C unit is moved up top and cabinetry construction has begun. Now I want to secure the unit down to the cabinet...
But, I made choices and now I must sleep in the bed I made.....How's that for an incomplete metaphor? Yes, I chose to keep the cabinet that the A/C unit is in as conservative as possible, which means there is no space to spare. Which means..."How the hell am I going to get a hand ratchet in there? I'm going to use a round head stove bolt so from the underside you see a rivet like round head. So that means that the nut has to go up top. And I can barely get my paws in there to finger thread a nut onto the bolt.
Daddy needs a new shiny tool!!

The right tool for the right job! This flex cable attachment allows me to get into, and there for out of, some pretty tight spots! Awesome! Check that job off the list!

Next job buzzing around my head was to reconfigure the destination window sign. Quite simple really. I have the sign set up so the manual handle is on the left...
I want it on the right. So I contacted the good folks at Transign LLC to inquire how I could do this. I mean obviously flip the sign end for end. But then as equally obvious is my text will be upside down! So I needed to know if I can pull the rollers and flip them too so the text will be correct. They were awesome! I sent them an email in the morning, during my lunch the tech called me and walked me through what and how to do it.

So I laid things out, flipped, turned, retape and voilà


Destination sign...same but different!


Tuesday, May 10, 2016

Ahhh Newton!

I have been thinking about our good friend Sir Isaac Newton these days. For a few different reasons really, one of which is my daughter and her high school physics. The other is my son and his school. No Jeff is not heavily delving into physics yet but there have been promises made that Fillmore will be ready enough to comfortably escort Jeff and his buddies to their grade 8 farewell. Which is where Newton comes into play.
Law#1:
 Every object in a state of uniform motion tends to remain in that state of motion unless an external force is applied to it.

So when I get going, then progress is made, things are getting done...unless I run into the force of time,logic or desire.
Some days I wish there were 32 hours in a day, then I could really get my teeth into things, but the more I get into things the more I realize I need to do things right the first time. Spend time to save time...my desires are logical!

In the last post regarding the rear cabinet you'll notice the sub floor has a "line" across it mid way. That was angle iron that was marked and trimmed to support the floor over the span of the aisle .I had thought I would be happy with the design with the angle iron  showing no profile above or  below the floor  to maximize space and allow for a drawer under the floor. The drawer will happen regardless, but I didn't like the way it looked from above,or the way it felt when I walked on it. The worst part is I knew I wouldn't....but I kept talking myself out of it and saying "It'll be fine...you can change it later." I mean I'm on a deadline!

In the end, I have a more stable floor, better aesthetics, and I only loose 3/4" in "yet to be constructed" drawer depth.
Now I'm going to fly past Newtons second Law because it has to do with Force and my mass....and I haven't been to terrible active these days so I'm sensitive about my coveralls making my mass look big.So...
Newtons Law #3


III. For every action there is an equal and opposite reaction.

So I changed the floor supports...fine, no harm done. But then Mr smartie pants decided that I needed to change out the flooring piece as well...because it was logical to do it now. Here's the unforeseen problem. The temporary floor boards were just that, meant to be temporary. But with time and distraction I forgot that there was a mathematical problem to the boards as well. They were 5/8" thick. The rest of the flooring is 3/4"thick. The rear bench was constructed with the support legs resting on the 5/8" flooring. When I changed out the flooring under the supports. The bench is now 1/8" higher that the side boxes that sit on the unchanged flooring. By placing sub floor supports I caused a chain reaction that made the side boxes too low.


Now I had to rise to the occasion you might say...
(or you might not because of the lameness of the pun)


At fist I thought I would have to hand craft the rounded edge. Multiple pieces were cut, glues and brad nailed.
Until I realized I had the materials and the tools....so the remaining box was easy.

The first one turned out just fine, good contour and strength, but a wee bit more time consuming!

Wednesday, May 4, 2016

What lies beneath....

OK perhaps a misleading and entirely over dramatic reference to what I thought was a great "who done it" kind of movie. A bit of a stretch to try to successfully tie it in to the ongoing journey of Fillmore, but 'ehhh!..you do whatcha gotta do".
I guess what I'm trying to say is that, like many times before, we have proceeded to a point of progress, only to have to stop and rewind so that we can proceed.The rear bench is shaping up beautifully but before I can secure everything down I have a job to do that lies under the small subfloor.

And this my friends is what is going to fix the concern.
A sheet of rubber. I can't even remember when I got it or where. I have been using it for gaskets and such, but holding onto the biggest piece for this job. It was a challenge to find it in the unorganized mayhem I call my garage! I swear if I win the lotto I will build a big shop with LOTS of shelving
The area of concern for me is where the wiring harnesses come into the living space. It's always just been a big open hole. So I created two "u" shaped brackets with a sling of the rubber on each. Assembled together I get a nice seal to minimize air flow...
...and critter flow too!
As I work away....my young padawan...was busy creating his own project.


I am so proud of both my kids, they both have their own ways of being creative. Anna is a beautiful dancer and tremendous performer(not to mention her knack for the visual arts) And my son Jeff never ceases to amaze me with his creative vision and ability to be undaunted by a task at hand. Often his only stumbling block is materials....and permission. This time he had both. Except for the moment when he needed a chain saw...although I am confident he is competent....the parental unit in me said "Whoa.....wait a second there cowboy! Why don't we say, You help me and I'll help you".
So I took down a tree so he could construct a bike swing and he helped me resize a storage box for under the back bench seat.


Oh No! Not again!!

You may remember this time last year I found a  wee problem I had been checking things out and found a significant break in my flywheel hous...