Thursday, November 5, 2020

The Devil's in the details

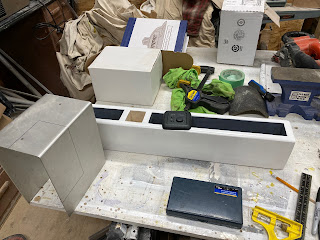
So As I get ready to install the 'back shelf' as I have grown to call it. I realized I was about to install the shelf overtop of a very important piece of the puzzle. Specifically the element control for the cook top. After install in the counter I had the control tucked in behind until a time that I figured out where to best mount the control panel. Out of sight is out of mind.......good thing I remembered
I have to make sure I don't pull a bone head move and mount the control over top or behind where the elements are. Nothing more frustrating than having to turn down the heat for a boiling pot of water and having to reach through the stream from the offending pot to do so!
This is actually a great opportunity to get two birds with one stone. You'll notice a small square in the back shelf. That is the air supply or intake for the cooktop. I was brainstorming how I can leave that open but yet stylishly cover the opening. In walks in the brushed aluminum bracket that I have been hording for just the right moment.

Some measurements and tracings, then re measure and re trace...finally after the appropriate amount of humming and hawing.....I committed. 
Set in place it has the desired effect I was looking for. A stylish mounting bracket for the cooktop that visually covers the air intake. I still need to create a small mounting block inside the back shelf. Then we can deliver to the bus interior.


Monday, November 2, 2020

Just like that....."BAM".....it's winter!

We were sitting on the deck on a thursday exclaiming how wonderful of a fall it had been. The leaves had a chance to turn and hang on for weeks. The vistas were beautiful. The next day by 2pm it was full on blizzard.....and just like that....its winter.

But what can you do but embrace mother nature. I'm a winter guy(although I would love more daylight for it) so we bundled up and listened to the squeek of the snow beneath our boots.
After last spring, when we had record amount of snow, I decided that I needed to up grade some of our snowshoes, courtesy of my in-laws. Now I could scrap these old fellers like our throw away society seems to promote, but instead I decided to create oldschool snowshoes 2.0
I found a company out of Quebec that manufactures modern snowshoe bindings for old school snowshoes. They seem to work like a dam.....I'll see what the field test shows when we get enough snow on the ground.
Meanwhile, as I wait for a new Voltage regulator I decided to heat up the inside of the bus and work on some kitchen trim. I still have aluminum stock that I purchased
The hardest part of this whole process is the little curve at the end. It took some playing but eventually I got what I liked
Test fit proved positive.
Now to build a storage shelf/container thingy that matches the drives side
Starting with the paining process, sanding and primer layer are done, now a coat of three of the cabinet paint
While I await the paint to dry, I spent my time polishing the trim piece. This is an exercise in patience. The process is multi step and slow, you really cant rush this....if you do it usually comes back to bite you in the back side.
After I spent a good half hour going through the different grades of buffing compound, my end result was pretty slick....the guy in the reflection not so much, but the mirror polish ...pretty slick!
 I was so proud of myself, I decide to reward myself with a special treat!


Tuesday, October 13, 2020

In all my years......I have never....

19 years. That's how long I have lived in Bragg Creek. In all my years I have seen a few black bears, a grizzly, lots of moose, a literal herd of deer, elk, coyotes, marten, squirrels, owls, hawks, even an eagle or two. But never had I ever seen a cougar. I had heard of them in the area, I had talked to friends and neighbors who caught glimpses of them running across the road. But never had I ever been able to sit less than 50 feet away (in a car)from two of them feeding on a fresh kill.
At 10:30 last thursday night by friend and neighbor texted me and said " what are you doing?" When I said watching TV he simply said...."get over here". I am convinced that he would have said get over here if I said I was doing anything aside from active CPR on someone, alas I digress.... When I got to his place we hopped in his car and drove 200 meters down the road and , what you see above is what we saw that night. Truly a once in a life time opportunity.
Not quite as exciting to the general populous as seeing one of  North Americas fiercest hunters but just as exciting for me....my new starter came in. But before I wanted to put the starter in place I had a couple of other things on my to do list
This is where the starter mounts on to the flywheel housing. If you look inside you'll see the ring gear where the starter engages and turns the engine over. This is significant right now because of the tachometer.
I know about now you are scratching your head and saying....."what???"
Allow me to go back in time. There are two ways to run your tach, off the alternator or a sensor that counts the teeth on your fly wheel...called a Halls effect sensor I think.  However....when you switch out an engine your calibration is all shot as your ring gear is different etc. So when I swapped out the engine back in 2011 from a gas to a  diesel I wasn't able to hook up the tach as it didn't have the ability to be switched from working with an 8 cyl gas engine to a 6 cyl diesel . A subsequent search found that I could not find a diesel tach that matched my instrument cluster. I remained optimistic and persistent....and maybe stubborn as well. I found an after market piece of tech that will take the signal from the sensor and convert it to work in the tach meant for a gas engine. The trick is you have to know how many teeth are on your ring gear to set up the conversion properly. Up until now I put it low on my list of things "to do", I wasn't going to pull the starter just to count the teeth, but now out of necessity....here we are. 
I was going to have to enlist the help of my lovely side kick. My partner in life, my buddy.....my sweetheart who really doesn't like to get herself dirty , greasy, or to generally "smell like bus"
So before I conscript her to crawl under the engine and count teeth on the ring gear I must make the environment as hospitable as possible. While I was removing the old starter I noticed that my flex pipe in the exhaust system was.....well.... toast. So I need to remove the exhaust and repair it. Seems like a good time.
Once it was out it was a quick fix and I still managed to have a piece of 4" flex pipe kicking around. Before I put it back in though, it was a good time to get Michelle. Without the exhaust there was more room for the task at hand.
I put down a clean carpet, got her some coveralls, a bright lite....I even had classical music playing on the radio!
At this point I had to remove the rear shroud for the engine bay so that I could access the flywheel in order to turn the engine and advance the ring gear so Michelle could count. As I mentioned in the previous post, this was the point where I realized I recognized the wiring harness that was responsible for my battery drain. The voltage regulator!!
Ring gear counted, starter put in place, exhaust fixed and now reinstalled. I'm just waiting for a new regulator and we should be good......
Except for the damn fuel shut off solenoid....


Wednesday, October 7, 2020

Send your worries away

 Monday nights are the meeting of the "one loop, two pints group". Basically a bunch of 50ish Dads that want to get out and hit the mountain bike trails, be active and have a group of guys that you're held accountable to if you try and bail.  We will go out for an hour or two and then have a pint at the local pub. This summer has been a great one for wildlife on the rides. A month or two ago we came across a grizzly , last week we saw a momma moose.....I wonder what the future will bring??


As summer turned to fall and in the foothills of the Rockies winter is a short time from that, the thought of winter tires played on my mind. What also played on my mind is where I store my winter tires (on the roof of my shop) and how I get them up there(I hoof them up on my shoulder one by one up the ladder. Being that my teenage workhorse has left the proverbial nest, and I'm not getting any younger. I decided to work smarter not harder. So I fashioned a swing arm tire lift(crane) 

This is just another example of the fact that I weld, but I am not so bold as to say I am a welder
My welds aren't pretty but they do the job!
I still need to do a little electrical work to extend my control module for the lift but, in time.....in time.

Now back to my battery drain. In the last post I started to search for the source of the drain on the engine battery. I didn't get to far into the search when I stumbled across another (significant) problem of the cracked starter mount. I have ordered a new starter and while I wait I decided to continue my search for the elusive electric parasite. I shut everything off and then placed my multimeter in line on the negative side of the battery and you can see the drain.
I then kept the technique simple and started pulling fuses and watching the meter. I went through every fuse and every relay and found nothing! I checked and re-checked and came up with the same result.

I decided to dig a little deeper and make sure I was getting all feeds. When I pulled my fuse panel away to study the battery isolator, that is when I spotted it. A line running to the engine side of the isolator with an inline fuse. When I pulled the fuse, my drain disappeared. The wires were wrapped in a very distinctive shrink wrap. I remembered installing the wiring harness but I couldn't remember from what....furnace....speakers?
 This picture jumps ahead a tile or two of the dominoes that fell as a result of searching for the battery drain, but sufficed to say that I needed to remove the rear engine shroud to count teeth.....yes, yes I get the irony of my statement but it will make sense in a subsequent post. But when I did remove the rear I spotted the familiar wiring harness immediately.
Turns out the wiring harness was for the alternator and the voltage regulator. Again I tested. When I unplugged the voltage regulator the drain went away. When I left the regulator plugged in but unplugged the alternator...the drain remained. So I am very confident that replacing the regulator will take all my troubles away...

Monday, September 28, 2020

A special day or everyday is special?

Friday marked international Daughters day, and boy do I have a daughter to celebrate. Smart, stunning, driven, stubborn, loving, compassionate, the list goes on and on. All I can say is I love my little girl to the moon and back, and there was no better way to celebrate her than to watch her kick my ass up a mountain. So many hikes I would be coaxing you up the hill....somewhere you blew past me and now are the one patiently waiting for me to catch up. I love that you do and that you want to.
We are so proud of you , where you are and what you've done, and its just the beginning of your journey.
                                                                        You go girl!
On the Fillmore side of things....a funny thing has happened. I started having electrical issues. Particularly that something is causing my engine battery to drain. I'll have a fully functional, fully charged battery, then a few days later.....nothing. I checked the usual suspects but nothing! I charged my battery and let it sit outside the bus for a number of days and it held it's charge and the electronic battery evaluator says all is well.

Nothing was obvious, I put a multimeter in line on the negative side to see power draw but  I'm not even getting a consistent reading. So far I am still searching but along the way I have found some issues that are not likely associated with the draw, but need to be fixed none the less.
On the engine/chassis battery main shut off, I found one of the ring connectors was ready to fail. 
A simple fix.
The path of power if you will, from the positive terminal of the battery goes from the battery to the starter, then from the same post on the starter a lead to the fuse panel. I decided to follow the path, evaluating connections and connectors along the way. Fillmore has been running so dependably for so long I cant remember when the last time I just laid down underneath the old beast and just looked. So as I was following the electrical cables from the battery I saw something that made me do a double take.


Not really believing what I was seeing I decided to do the wiggle test.....and frankly I wasn't thinking I was going to see anything.....but.....
And that sealed the fate......nothing to do with my electrical issue but now I have uncovered another thing that needs my attention and needs it now.
The starter is mounted to the bell housing by three lonely bolts. One literally turned out of the housing with my fingers(oops), the second was tighter but nothing to write home about.....and then of course....the last one.
These are 12 point bolt heads, you can use a regular hex head socket...unless someone has already tried that and rounded the points on the dodecagon and your sockets are just slipping..... so off to Napa for a socket.
Unfortunately the bolt head was too far gone and I needed to pull out the hail Mary tools to see of it would budge. Some heat, a rap with a big hammer, tighten then loosen and eventually it came out.
Thankfully I don't have to put these ones back in.


Once that starter is out (heavy bugger) and on the bench top, the crack is very obvious. I can honestly say I've never seen one like this....not that I've seen a lot of cracked starter housings.....


                                                         

Wednesday, August 12, 2020

CRIB

March 16, 2020 was the date....I don't think I blogged it until a month later in April but, that was when our world started shutting down. That was the weekend that my brother and family came for a visit that got modified because of CoVid. Unfortunate for them but great for us....me in particular. On that trip Shawn and Adele helped design the cribbage crib, as I like to call it, for the bus.
                                             
This is a crude screen shot of the 3D modeling that they did

                    
And this is how it all turned out
This side is the metal inlay with acrylic top
                                        
And this side is the crib board....yet to be used for the first time.....perhaps soon??


Of course no matter how much I plan, there always seems to be some snag, as Robert Burns said, "the best laid schemes o' mice an' men". I designed one of the crib cabinets to house the subwoofer and also the crib table. Everything looked great until....
it seems I forgot to account for the retention pin knob. The only way the table will fit into the cabinet is to remove the knob and pin prior to stowing it away, and THAT will never work for me.


 But thankfully I was able to  trace the path of the knob placement on the table, then using a  forstner bit and the router to create an insertion channel. This is not the finished product but already allows the table to be stored, in its entirety, in the designated area as originally designed. 

Oh No! Not again!!

You may remember this time last year I found a  wee problem I had been checking things out and found a significant break in my flywheel hous...