Sunday, April 29, 2018

Step by step...

It's a funny feeling, but one of the reasons I maintain the blog is that it seems to be a way of keeping myself accountable to the ongoing progress of Fillmore. And, as such I often fight feelings of judgement while I make a blog post. Some are good and some are a little more in the  "looking down the nose" at myself. To be a little more clear, today for example, I sit here and type this post and all I can think of is...."Really?.......after spending all that time......is that all I got done?"
But worry not, the voice is quiet and meek, for every bit of progress is just that...progress. After spending what seemed like an eternity laying out and scribing flooring pieces, it was finally time to install them.
This of course was followed by installing the edge banding, which required replacement of my rebate bit. As I mentioned in a previous post I hit a screw (or two) which destroyed the bit. After visiting my usual haunts looking for a bit only 1/16" thick, I gave up and went to the internet.Thankfully amazon delivered right to my office!
Playing with the trim to allow flexibility....


The finished product was just what I had hoped for, clean and bright, simple and sleek. Now on to the couch...

Thursday, April 26, 2018

floored

  There is nothing that gets me going more when I'm behind the wheel than the guy ahead of you taking his sweet time going down the road. It's like they live in a different world, by a different set of rules and have no concept of time commitments. Makes me just want to sit back, giggle and wonder at the gangly/awkward beauty of it all.
 My grandfather once told me when I was a wee lad that time went faster the older you got. As a young impressionable boy who doted on his every word, this stuck with me, despite the fact that it made absolutely no sense. I mean everyone knows that there are 60 seconds in a minute, 60 minutes in and hour, 24 hours a day, 365 days a year. Einstein's theory of relativity proved that time (and space-for the record) is a constant, so I always assumed grandpa was just yanking my chain.
Little did I know...
 As I look at the calendar, there are 6 weeks to grey Owl, 9 weeks to Ann's Grad (where she has requested that Fillmore be her limo) with all but 2 weekends booked with dance and volleyball. With so much to get accomplished, time is flying by........oh, wait!... I get it gramps...my bad!
It is time to lay flooring on the drivers side, which means it is time to trim the floor to where I need it to be.


After an unsuccessful attempt at taking numerous measurements to create an elaborate cut out piece for under the kitchen counter. I remembered what my high school shops teacher Dan Tapley told us. If in doubt, make a paper template and test fit it. Much better.
 The beer helped too...
 As I toiled away, making seemingly painfully slow tortoise like progress, my 15 year old changed the plugs, filter and oil in a 1970 Datsun 240Z that we are charged with keeping safe and sound.
 I'm not sure if he realizes that not every kid has those skills, but I keep quiet aside from a conservative 'well done' and a gentle slap on the back.If I expressed my true pride,  I am sure all I'd get in response would be a very well executed eye roll followed by a dismissive "whatever!"

Wednesday, April 25, 2018

Dead as a door nail

 The weekend was here and I was going to enjoy the spring air. OK perhaps I was being stubborn, but one of my favourite things to do on the weekend is to get up early and enjoy some the  peace and quiet, the only sounds at that time in the morning is the hush of a breeze blowing down the eastern side of the foothills and the birds singing in the morning. Periodically interrupted by the sounds of a bundled up  middle aged human sitting outside  on his lawn chair slurping his morning coffee.
In the last post I showed you the installation of the cook top, I believe my closing remark was " once the final hook ups are done I can place a high temp silicone to seal the floor, and we should be off to the races!" Well...it seems I spoke too soon. I continued on and did do the final hook ups. And nothin'...notta...dead as a door nail.


Immediately I started to stew about where the failure occurred? In the cooktop unit?(bad,bad news) in the wiring (not great but better) or at the power source(maybe a faulty fuse!?)
First order of business was to test voltage along the feed...but first I had to find my electrical supply tub. I searched high and low, in the shop, on top of the shop, in the garage, in the old shop. I couldn't find it anywhere. As I stood in the doorway to the shop frustrated at the fact that prime working time was slipping away I decided that I will,very soon, have to organise my shop. I have never really taken the time to set it up in any organised way. I have stuff all over the place put in piles awaiting my efforts to organise and categorise....like the bin of " plumbing 'stuff' right there at my feet.....


Which looks a lot like the bin for the electrical supplies...........And so there it was.The electrical supply bin with a healthy layer of plumbing crap scattered on top.
This is what I was on the hunt for. A shout out to my buddy Chris Kruse who told me "everyone needs one of these" And he was right. It has saved hours of frustration trying to sort out electrical issues.
I started testing the power supply starting at the cooktop and working backwards. Nothing at the supply line coming into the cook top, nothing at the junction where we spliced into the coach harness, nothing back at the fuse box.


After some digging I found the problem. We tied in the loom to the fuse station, but we forgot to bring power to the fuse location! So, simple fix. I spliced power from a direct feed to a spare circuit. Now we have power to the cook top. I'll have to prime the fuel line and see if we truley are cooking with diesel.


In the meantime I put the couch back in place.........and removed the drivers side for it's flooring attention!

Thursday, April 19, 2018

Cookin' with Diesel!

Pieces are coming together, so much so that I sit and stare at things thinking that I am missing a step. But no, the time has come to install some of the long awaited components that I have had squirrelled away in various parts of the house,garage, shop, gym, furnace room, under my bed, well you get the idea. The idiom is "now we're cooking with gas", but in this instance we will not be using gas but rather diesel fuel!
I love the look on peoples faces when I tell them the cook top in the bus runs off diesel. The look is a combination of confusion and distaste. All they can think of is the smell of grandpa's farm truck and that doesn't bode well for the interior of a bus.
Space is tight, and we have planned for every nook and cranny of space. With some help from Michelle(she is much more willing to come out and help in Fillmore now that it doesn't "stink like bus") I was able to pretend I was a contortionist and crawl under the counter to mount the cook top ventilation box.
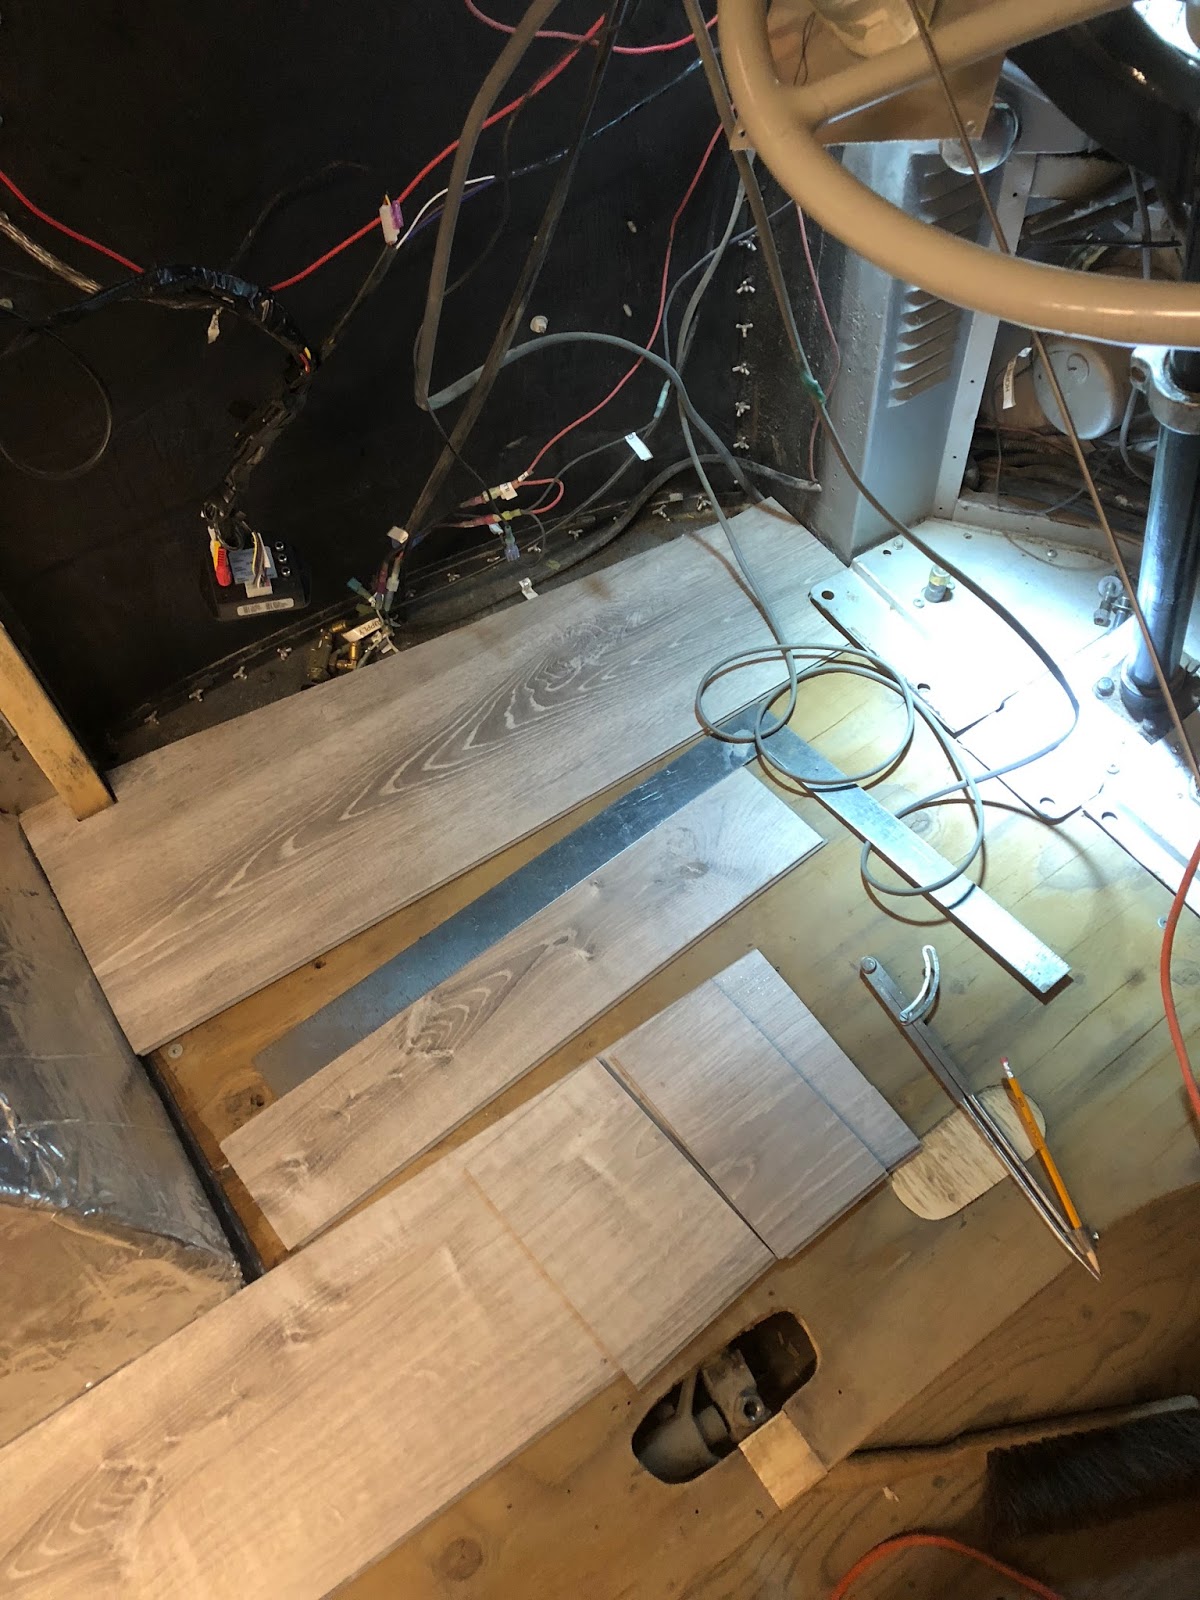
Once that was in place and all the hoses and wires were hooked up, it was time to run the exhaust pipe and cooling duct out through the floor......yep thru the floor. Now there's a non reversible step that strikes fear in the heart of a guy trying to do everything to not have holes in the project.
But, progress requires commitment and sacrifice....so on wards and upwards for progress.
Of course, because nothing is black and white, cut and dry, I need a hole that is 65mm in diameter for the cooling duct. Now if I HAD a metric hole saw kit this likely wouldn't be an issue....but I have imperial. So the closest I could get was a 2 1/2" hole which is 63.5mm diameter. Thankfully  at some point in the past I decided that I needed a sanding drum for my drill....thank be to the hardware store gods.

Everything fits nicely, once the final hook ups are done I can place a high temp silicone to seal the floor, and we should be off to the races!

Monday, April 16, 2018

A little Bling

Once I had the passenger side galley counter in place, it was time to remove it again (of course) for some finishing work in the warmth of the shop.
I really don't want sharp 90 degree corners on the counters...it would seem counter productive (sorry) given the trouble we've gone through to maintain rounded surfaces inside and out. As well I have to create a finished surface for the exposed edge of the counter top.At this point I was wishing my younger brother (with metal forming experience) was here

But after a GF beer to contemplate, I was able to create a profile I was happy with.


I tried on a few mounting screw styles...I bet you can guess which one was the winner


Once in place, and I made sure the drawers could open and close, I was happy...sort of. It was looking kind of dull if you asked me.


So a little time with polishing wheels and paste..And, as Emeral used to say, BAM!
This not only gives me a finished surface but also a raised edge on the counter by ~ 1/4" so that things don't roll off the counter top while en route or otherwise.


Wednesday, April 11, 2018

What am I missing...?

Have you ever walked around with a feeling like you're forgetting something? You know the little cloud that folows you around and puts doubt in your mind that there is something you haven't done. I am at that point. While I wait for paint to dry on the drivers side cabinet drawer fronts...
Which is both a satisfying and frustrating venture (I hate waiting for paint to dry....)
While I wait...I realised it was time. Time to reassemble, time to enlist the help of an otherwise bored teenager.

Anna and I re installed the mounts for the couch, then the cabinetry for the passenger side part of the split galley.

There is still work to do, but things are chugging along,due to the super efficient use of space, we spent a fair bit of time figuring out a mounting solution for the rear of the counter top. It should give us just enough room for the under counter housing for the cook top.
Yet,.....I still feel like I'm missing something because I didn't see me hitting this progress stage quite yet......

Saturday, April 7, 2018

On the edge of my seat....or floor.

 Another day of the sweet smells of wood chips and diesel. These two things make odd bedfellows, but yet...it was a perfect blend of sweet acrid pine and the comforting smell of raw power(as my good friend Chris likes to say). The day started with sunshine and  hot coffee, after feeding the troupes I meandered out to the bus shelter to continue on my quest. Today was more of the same, cabinets. The components had been made, now it is time to make the drawer fronts and fine tune the positions.


After a few dry fits, it was time to mount the hardware. Being that nothing is perfectly square and nothings is totally repeatable...every drawer requires it's own personal touch.
After a trim here and a sanding there, I wanted to place some veneer banding on the edges. It just makes the painting and sanding go that much easier. Once all the drawer front edge banding was completed, I give the drawers a healthy coat of filler. Most of the filler I end up sanding off, but it gives the surface a smoother starting point which again makes the painting go a little smoother.
 The beauty of keeping so many irons in the fire with Fillmore is that when we need to let one job cool (or dry as it were). There is plenty of others that need to be finished.
 In February, when Ron was here, we laid down some flooring on the passenger side. Now that we are posed to re-install the couch and newly constructed split galley, it was time to finish the job of the flooring. First I had to flush trim the laminate.......a little messier that I had anticipated.

 But Nothing ventured...nothing gained.
 Once all the mess was cleaned up I was able to install the aluminum edge banding(T molding).
Within seconds, or more aptly put: "inches", of starting to cut the rebate for the edge banding I hit two screws and totally ruined my slot cutter. But I was not only stubbornly optimistic, but perhaps in a little bit of denial as to how bad the blade really was. I'm not so sure I cut the slot in the flooring as much as perhaps I burned the slot into the flooring......
But after all was said and done....and I have to order a new blade for the drivers side.. the molding was in place  and now we are ready for the next step!

Wednesday, April 4, 2018

Hola!

There has been a whirl wind of activity around the Sinclair household as of late. Anna and I have been to Guatemala with Dentistry For All, working with the less fortunate and under serviced people of northern Guatemala. In the days just proceeding our departure Michelle and I managed to squeeze out a hike up ranger and Anna was busy giving pre trip interviews


All the while I try to squeeze out a moment here and a minute there...
The kitchen cabinetry continues to develop. As I try to use every nook and cranny under the sink area, I have to get creative. The picture above is a cabinet that will fit in right under the sink. The bottom section is a regular drawer, the top is at first glance, unusable space. But I thought if instead of a drawer we made a hinged container...

So I found some low profile blind cabinet hinges. Gave them a test fit on some scrap wood, and it should work!

Once together in the shop, things are looking great
However, as our good man Robbie burns once said "the best laid plans of mice and men often go awry". I swera I measured and measured, but something was lost in translation, and the drawer and "bucket" wont close properly.


The culprit for the bucket is the drain trap, the culprit for the drawer is the draoin piupe into the grey water tank. Both will be fixable....just have to get a little creative!


Oh No! Not again!!

You may remember this time last year I found a  wee problem I had been checking things out and found a significant break in my flywheel hous...